We asked our contributors what their favorite underwater photography technique was and they sent us images and insights into a range of intriguing techniques from close-up wide-angle to use of reflective cylinders and Snell's window to circular fisheye and snoots to using sunballs and sunrays for backlighting as well as how to create black backgrounds. X-Ray Mag contributors share their favorite techniques and details on how to use them to achieve compelling images.

Contributed by
(To see all photos, please scroll down and download the full article PDF.)
Snooting
Text and photos by Kate Jonker
When I first started making photos underwater, I was drawn to the minimalistic, colour-popping black background macro images I saw on social media. I soon learnt that this technique was known as “snooting,” where only the subject is lit by a very narrow beam of light, leaving the rest of its surroundings completely black. This is achieved by narrowing the beam of your strobe—either by DIY means or by purchasing a specially made snoot.
The DIY method can involve attaching an item such as a short length of old wetsuit, PVC piping or even an old CV boot to the front of your strobe. The possibilities are endless and all one needs to remember is the smaller the diameter of the hole, the narrower the beam of light.
There are numerous snoots available on the market today that you simply attach to the front of your strobe. Some are simple and just narrow the beam of light, some channel the light down a narrow tube of fibre optics, and others use optical lenses to concentrate the beam down a tube without losing quality of light.
An important thing to consider when purchasing or making your own snoot is that you need to know where it is pointing. The best way to do this is by having the focus light of your strobe light up exactly where your snoot is going to light, and most commercially bought snoots provide for this.
I attach my snooted strobe to the left handle of my housing using a medium and a short strobe arm. This gives me enough length to move the snoot into the position I want it to be. Before taking a photo of my subject, I move my snoot until it is centred in front of my port, pointing downwards approximately the same distance from the front of my port that I expect my subject to be. I find a stone similar in size to my intended subject. Looking through my viewfinder, I move my strobe with my left hand, until the focus light falls exactly on my stone. I tighten my strobe arms, and using back button focus, make sure that my subject is still in focus and lit correctly. I then go and shoot my intended subject.
Snooting can be challenging, and it does take a lot of getting used to—but the end results are worth the effort! Visit: katejonker.com
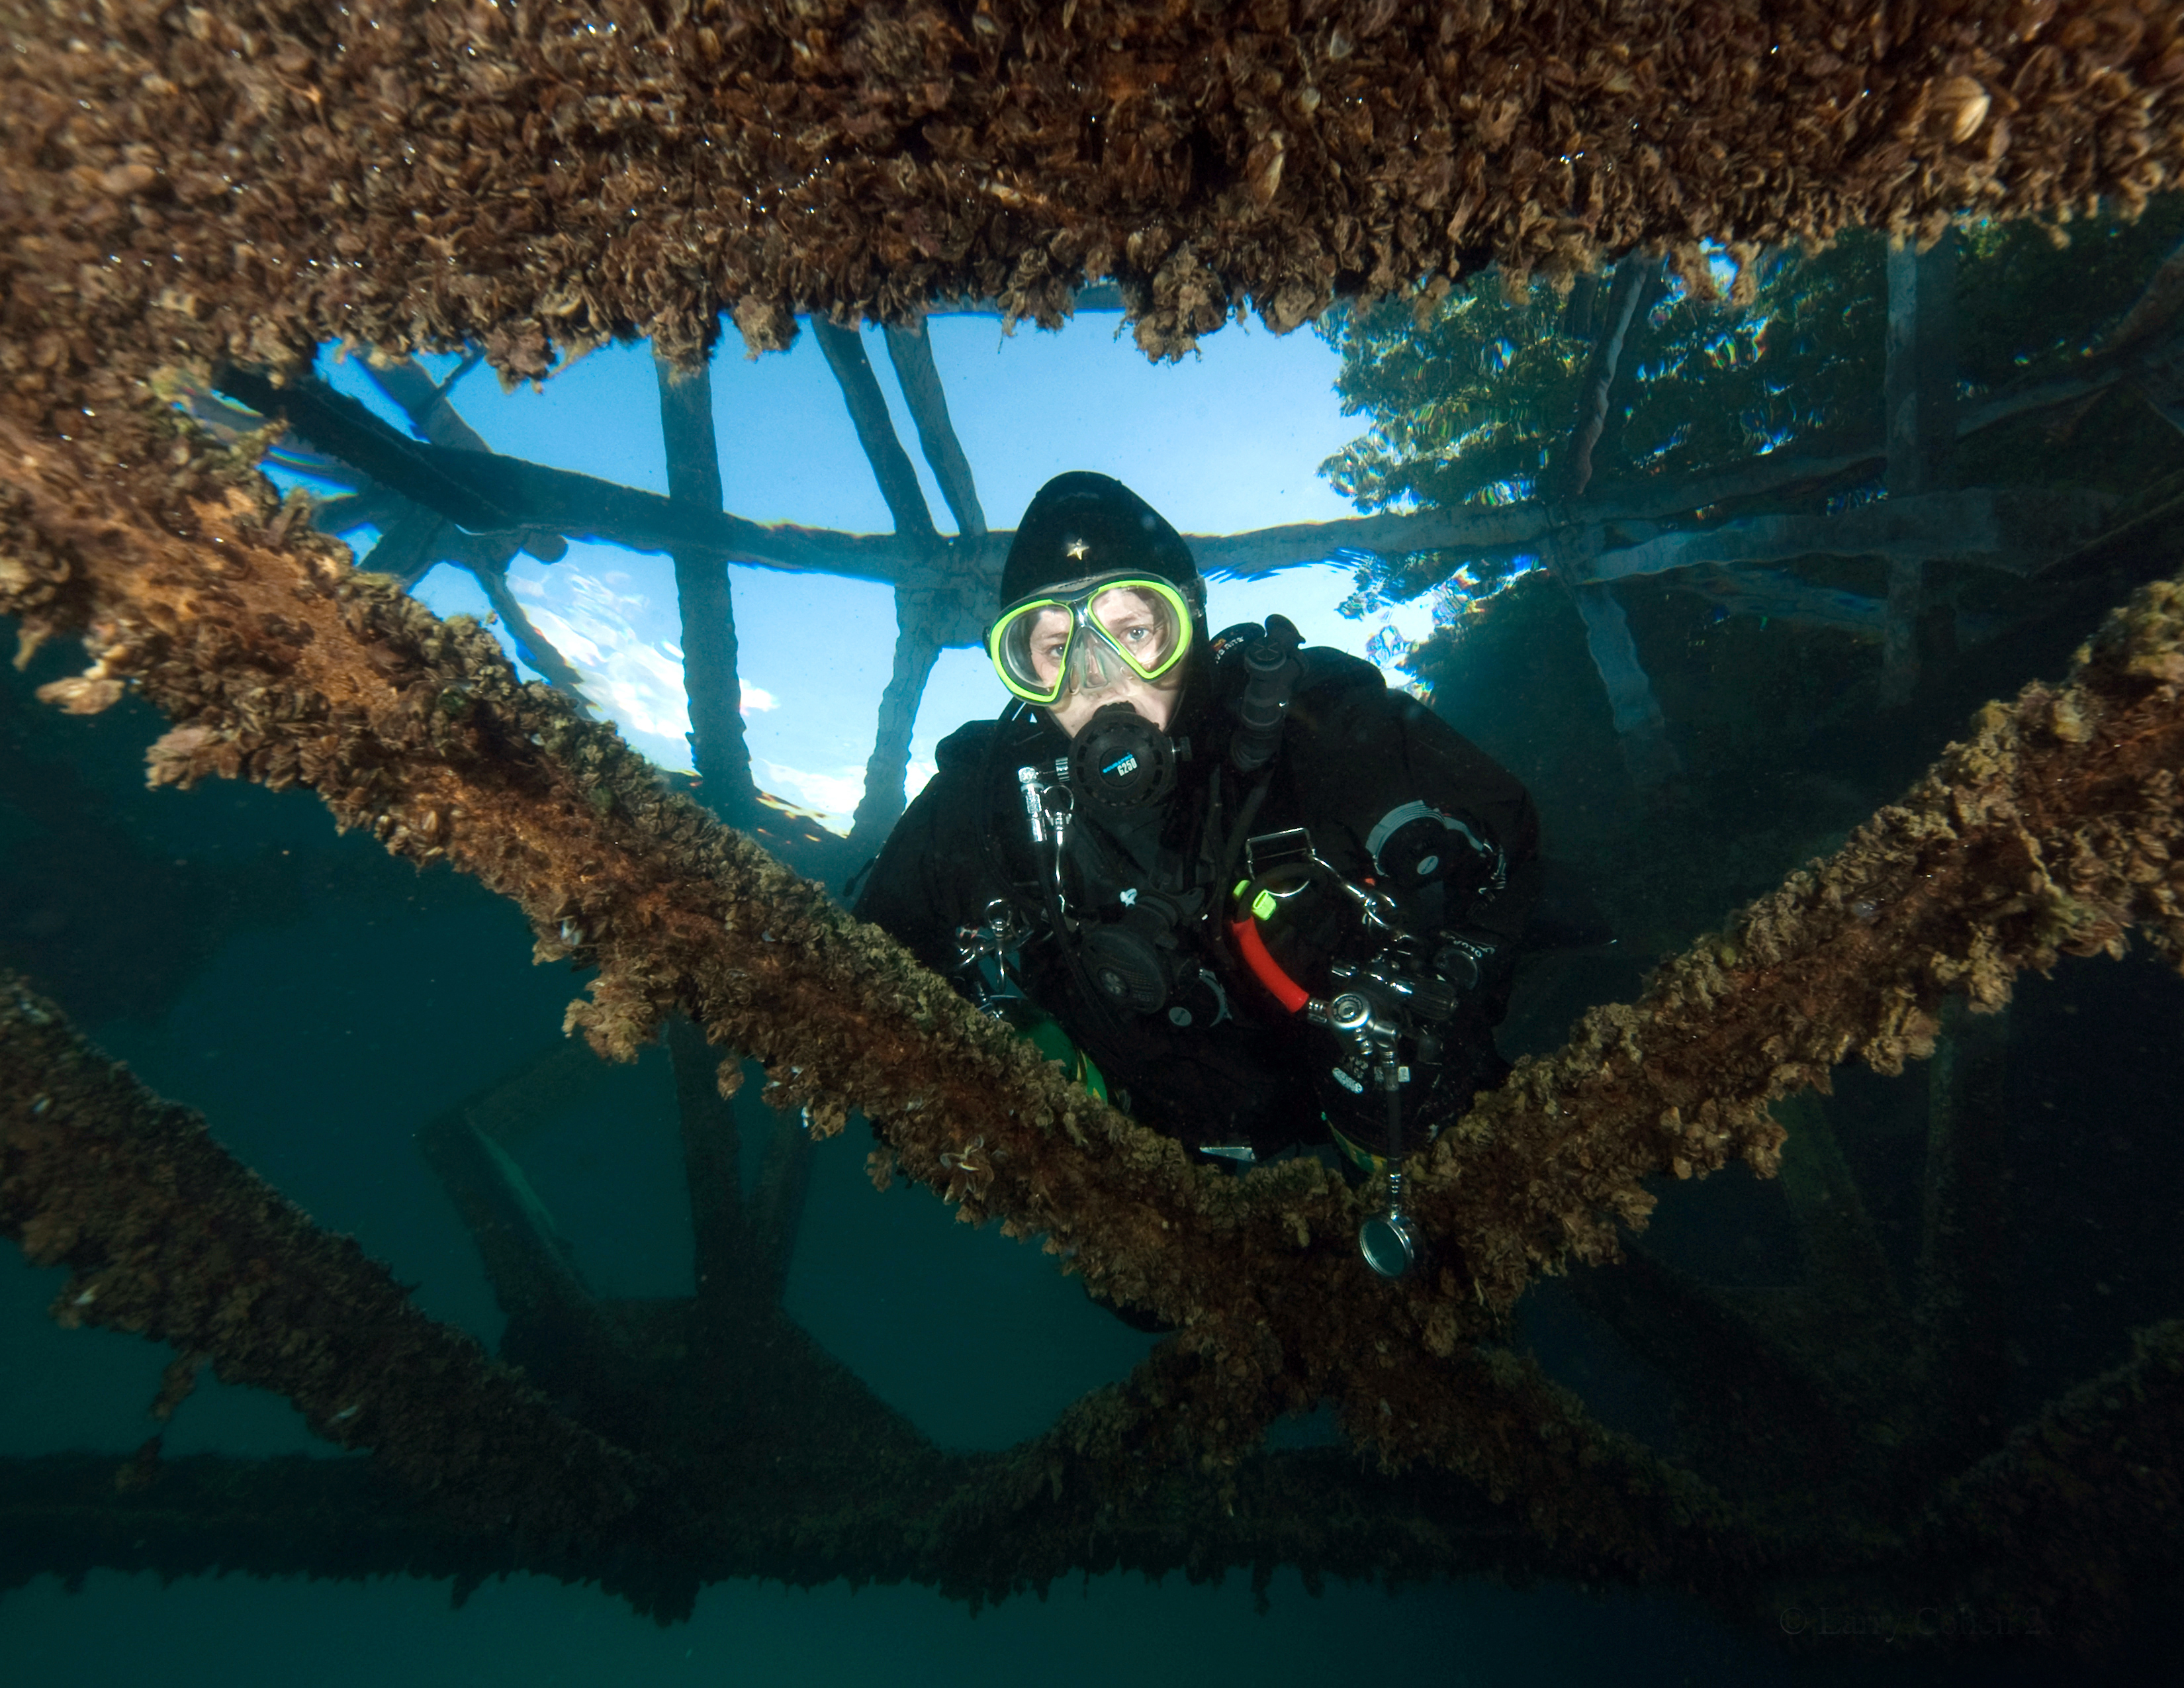
Snell’s Window
Text and photos by Larry Cohen
As much as I enjoy creating photographs in deep water, there are some advantages to staying shallow. When one produces images close to the surface, there is plenty of ambient light. One may also make use of reflections and Snell’s window, a phenomenon by which an underwater viewer sees everything above the surface through a cone of light. This phenomenon is caused by the refraction of light entering the water.1
Including Snell’s window in a photo is one of my favorite underwater photography techniques. It is essential to shoot upwards and experiment with the angle until you can see the surface through the water. You need to make sure your shutter speed and aperture are correct to capture the above-water portion of the photo and balance the underwater part of the image with your strobe power.
I was able to create compelling images at Dutch Springs near the pump house. Photographing my dive buddy Olga Torrey in her dive gear, I captured the blue-sky clouds and trees. Taking a photo of Olga swimming on the platform, I used the smokestacks, which stem from the time when this was a working quarry, in the image. On a brisk fall day, I used the smokestacks as a background when photographing leaves floating on the surface from underneath. 1 Wikipedia. Visit: liquidimagesuw.com
Close-Focus Wide-Angle
Text and photos by Brent Durand
Conditions are highly variable here in northern California. Macro photography is always a safe bet when setting up the camera; however, I try to shoot wide-angle as often as possible.
The close-focus wide-angle (CFWA) technique combined with my Canon 16-35mm f/4L rectilinear wide-angle lens allows me to create images in conditions ranging from exceptional to just 1.5m (4ft) of visibility. CFWA is a versatile technique that emphasizes the subject in the composition regardless of the environment around it.
This technique does provide challenges, however. The subject must be the size of your hand or larger, the subject must be located on an area of the reef suitable to compose a nice image, lighting is tricky with the subject so close to a large dome port, and wave surge can make precise composition physically demanding.
Close-focus wide-angle can be used to create bold, impactful images, and I find myself using the technique in every dive image portfolio. Please visit: tutorials.brentdurand.com
Reflective Cylinder
Text and photos by Lureen Ferretti
From ordinary to extraordinary—the simplest method I was introduced to is shooting through a reflective cylinder. I find clownfish in anemones irresistible and cannot resist photographing them, resulting in hundreds of similar photos. I add pizazz by shooting through a reflective cylinder. It creates a natural frame with the colors within the image and really makes your subject pop.
Does your prized subject hang out in places with hideous backgrounds or foregrounds? Another perfect use for the shiny tube—you can easily eliminate those distractions. Some corals and clams have brilliant colors and textures; shooting them through the reflective cylinder can transform bland images into interesting artwork.
You can purchase a cylinder at your local hardware store. To use, simply hold it in front of your dome port while taking a photo. Be careful not to touch your dome port with it. I have had the best success using it with a 60mm macro len. You can change the size and angle of the color swirl by moving the cylinder closer or farther away from the dome port and changing the angle until you find the perfect effect! Visit: DeepWaterPics.com
Sunbursts
Text and photos by Frankie Grant
While sunburst photography can be challenging, the results of much practice and patience in this discipline can yield unique and powerful images with very dynamic light. Remember to use high apertures and shutter speed, along with one or two strobes to light the area facing away from the sun. The sun acts as a backlight on your subject. Get creative! Visit: frankiegrant.com
Close-Focus Wide-Angle
Text and photos by Jennifer Idol
Perhaps it is my nearsightedness, but I love to get wildly close to a subject with my wide-angle lens. It features subjects in intimate and unusual ways, especially for unique subjects. I think of wide-angle close-up photography as the macro world for wide-angle, looking at a potentially small subject in context with its environment.
This type of photography generally refers to shooting within two feet of a subject, which also makes focusing a potential challenge. Although I prefer creating these photos with my 14-24mm wide-angle lens so I can take advantage of some of the distortion from shooting near a subject, any wide-angle lens can work.
As I look through the lens when shooting a subject in this way, I enjoy the detail in my scene. Although the landscape may appear large, the area I am shooting in is almost as small as when I shoot macro. This creates cropped moments that highlight the subject.
Most of my wide-angle photos are created using this style, though they may appear otherwise. I also take care not to disturb wildlife, and I approach slowly or let them approach me to get the shot. Visit: uwDesigner.com
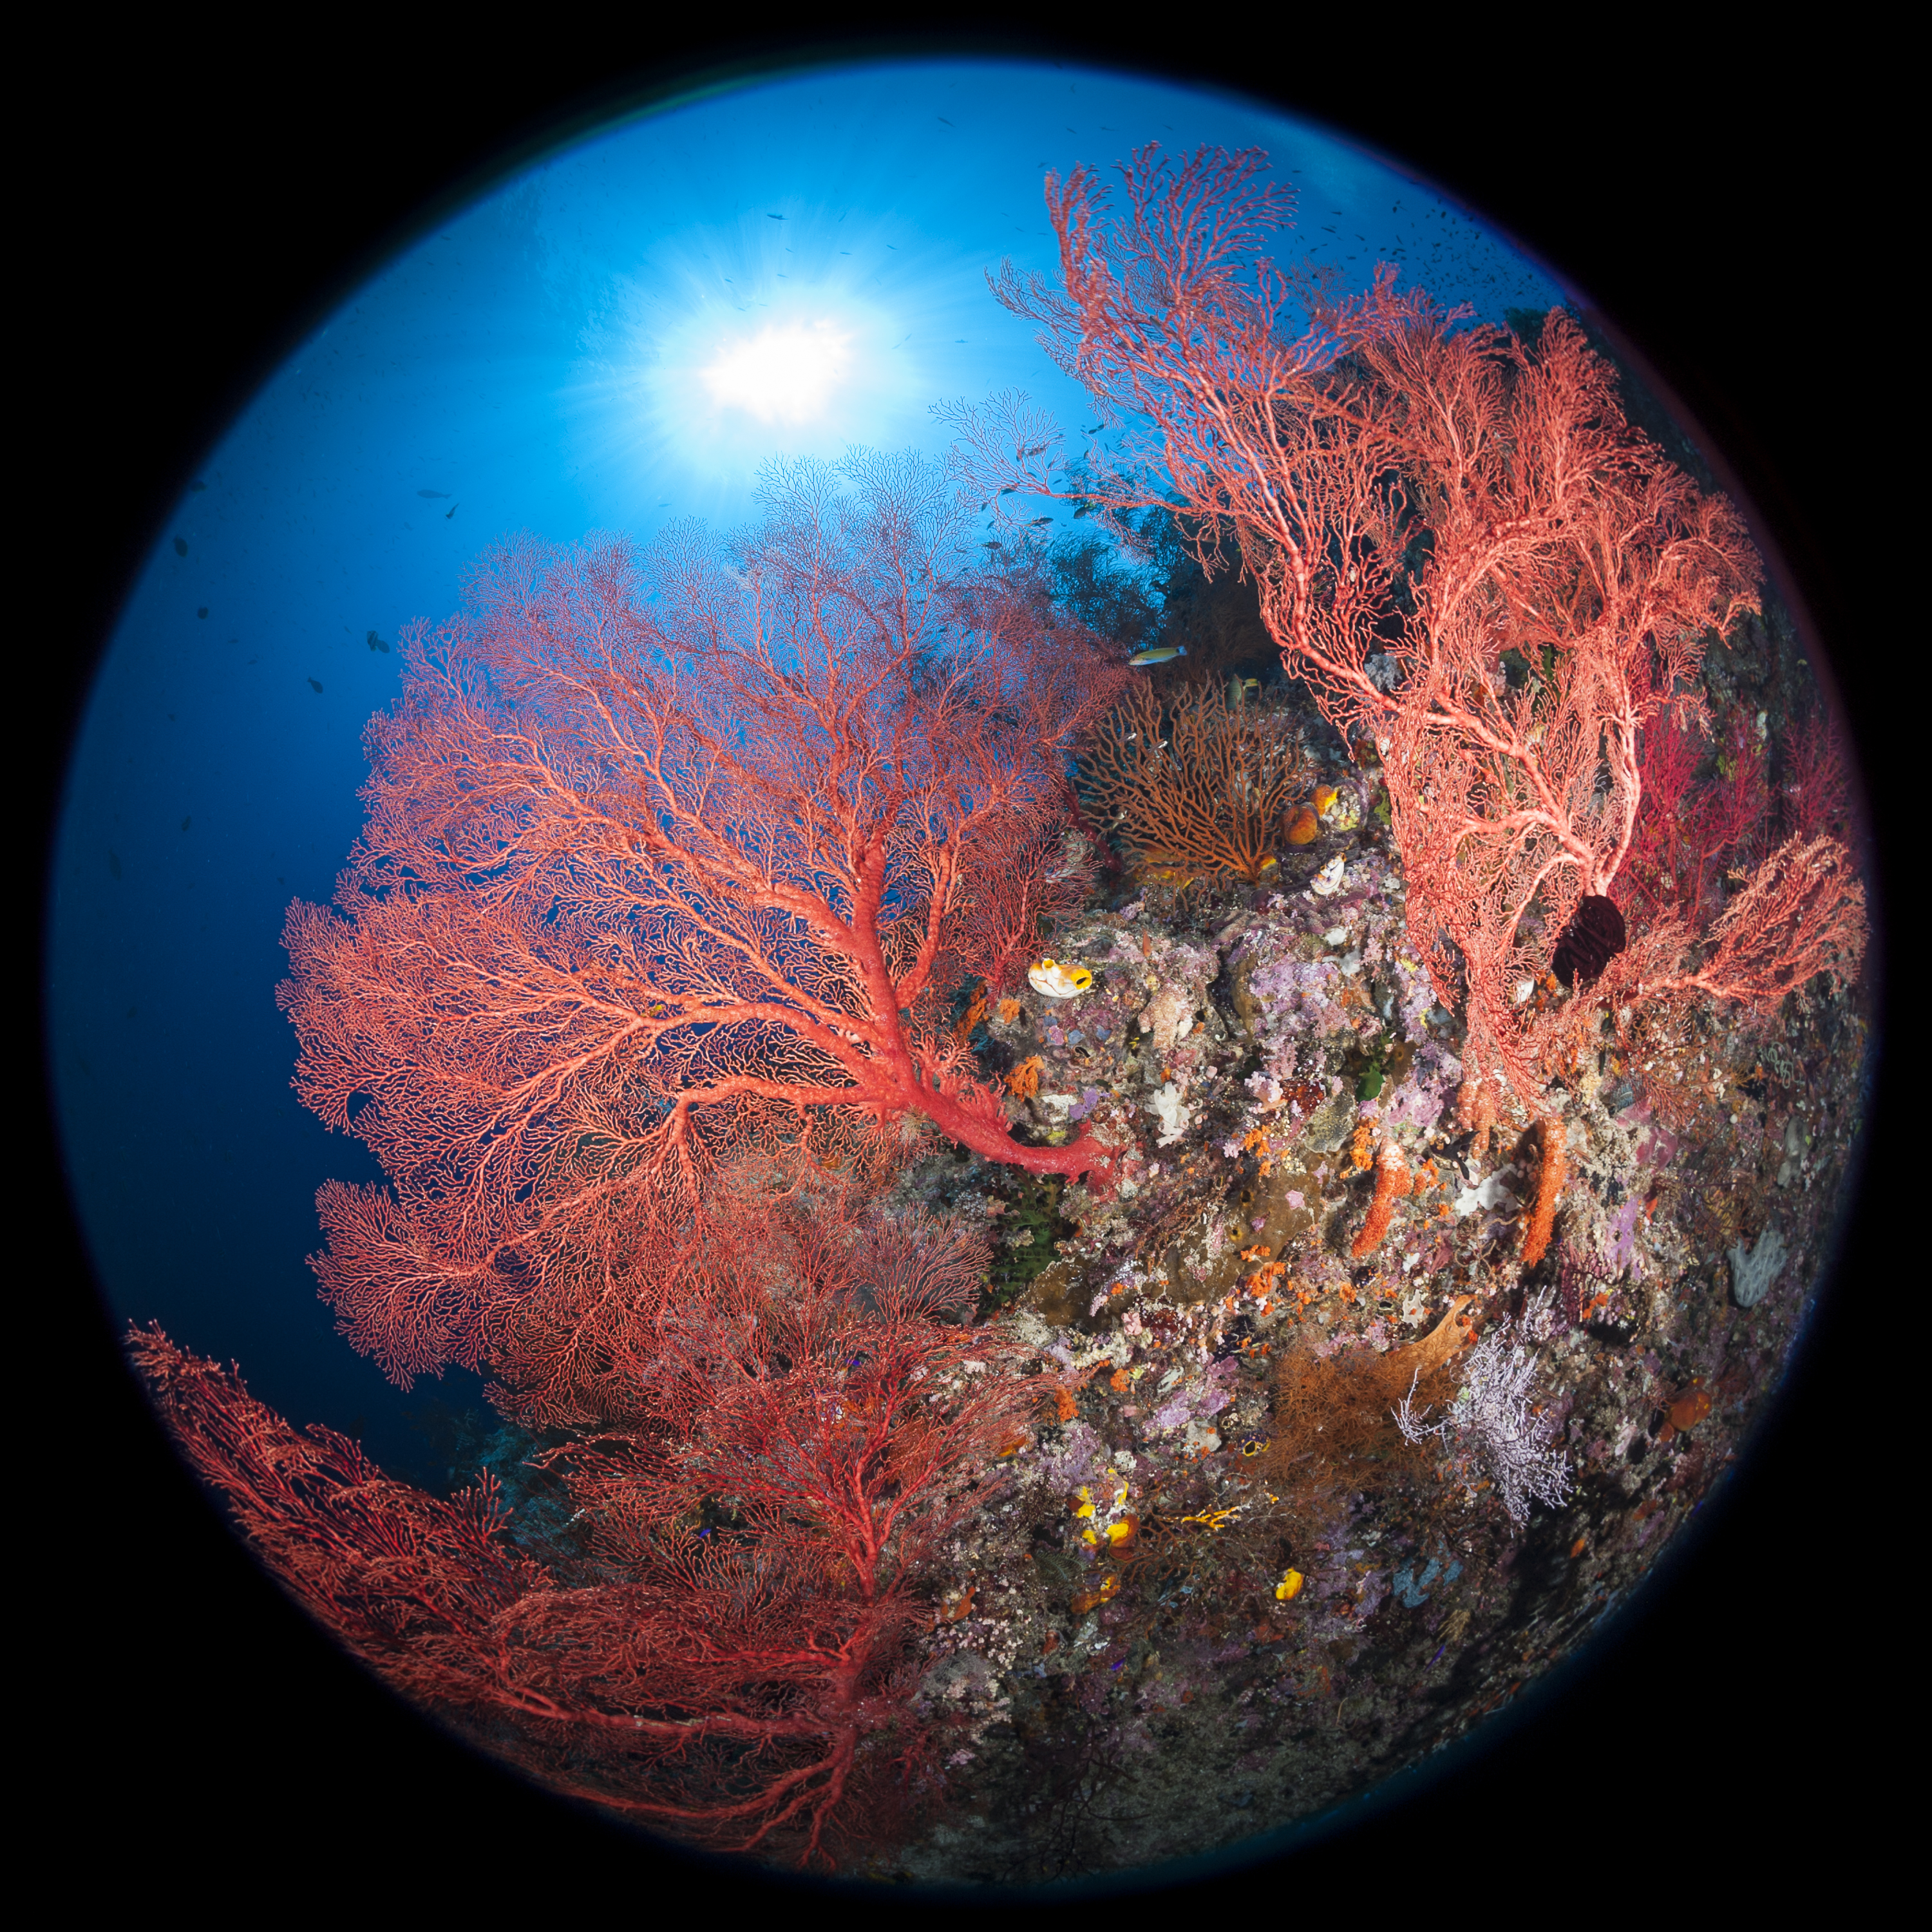
Circular Fisheye Lens
Text and photos by Matthew Meier
Shooting with a circular fisheye lens is similar to the close-focus wide-angle technique, except that you need to get even closer to your subject to fill the frame. Typical working distance is less than 1.5ft (0.5m) and requires impeccable buoyancy control so as not to damage delicate corals, sea fans, marine life or the dome port.
This specialty lens has a 360-degree field of view, which means that the dome shade must be removed, and as such, anything in front of the dome port will be in the photo, including your stray fin or a free-floating octopus hose. Powerful strobes with a wide beam angle and diffusers are best to illuminate such a wide area and create a balanced exposure. The strobes should be positioned in line with the housing handles, behind the dome port, at 10 and 2 o’clock or 9 and 3 o’clock, facing forward or slightly outwards and close enough together to light directly in front of the dome.
Choosing the appropriate subject matter is key to a successful composition when using this lens. Larger objects help fill the frame, and a sunball overhead can enhance the negative space. I also really enjoy the unique perspective created when using this lens on land. Visit: MatthewMeierPhoto.com

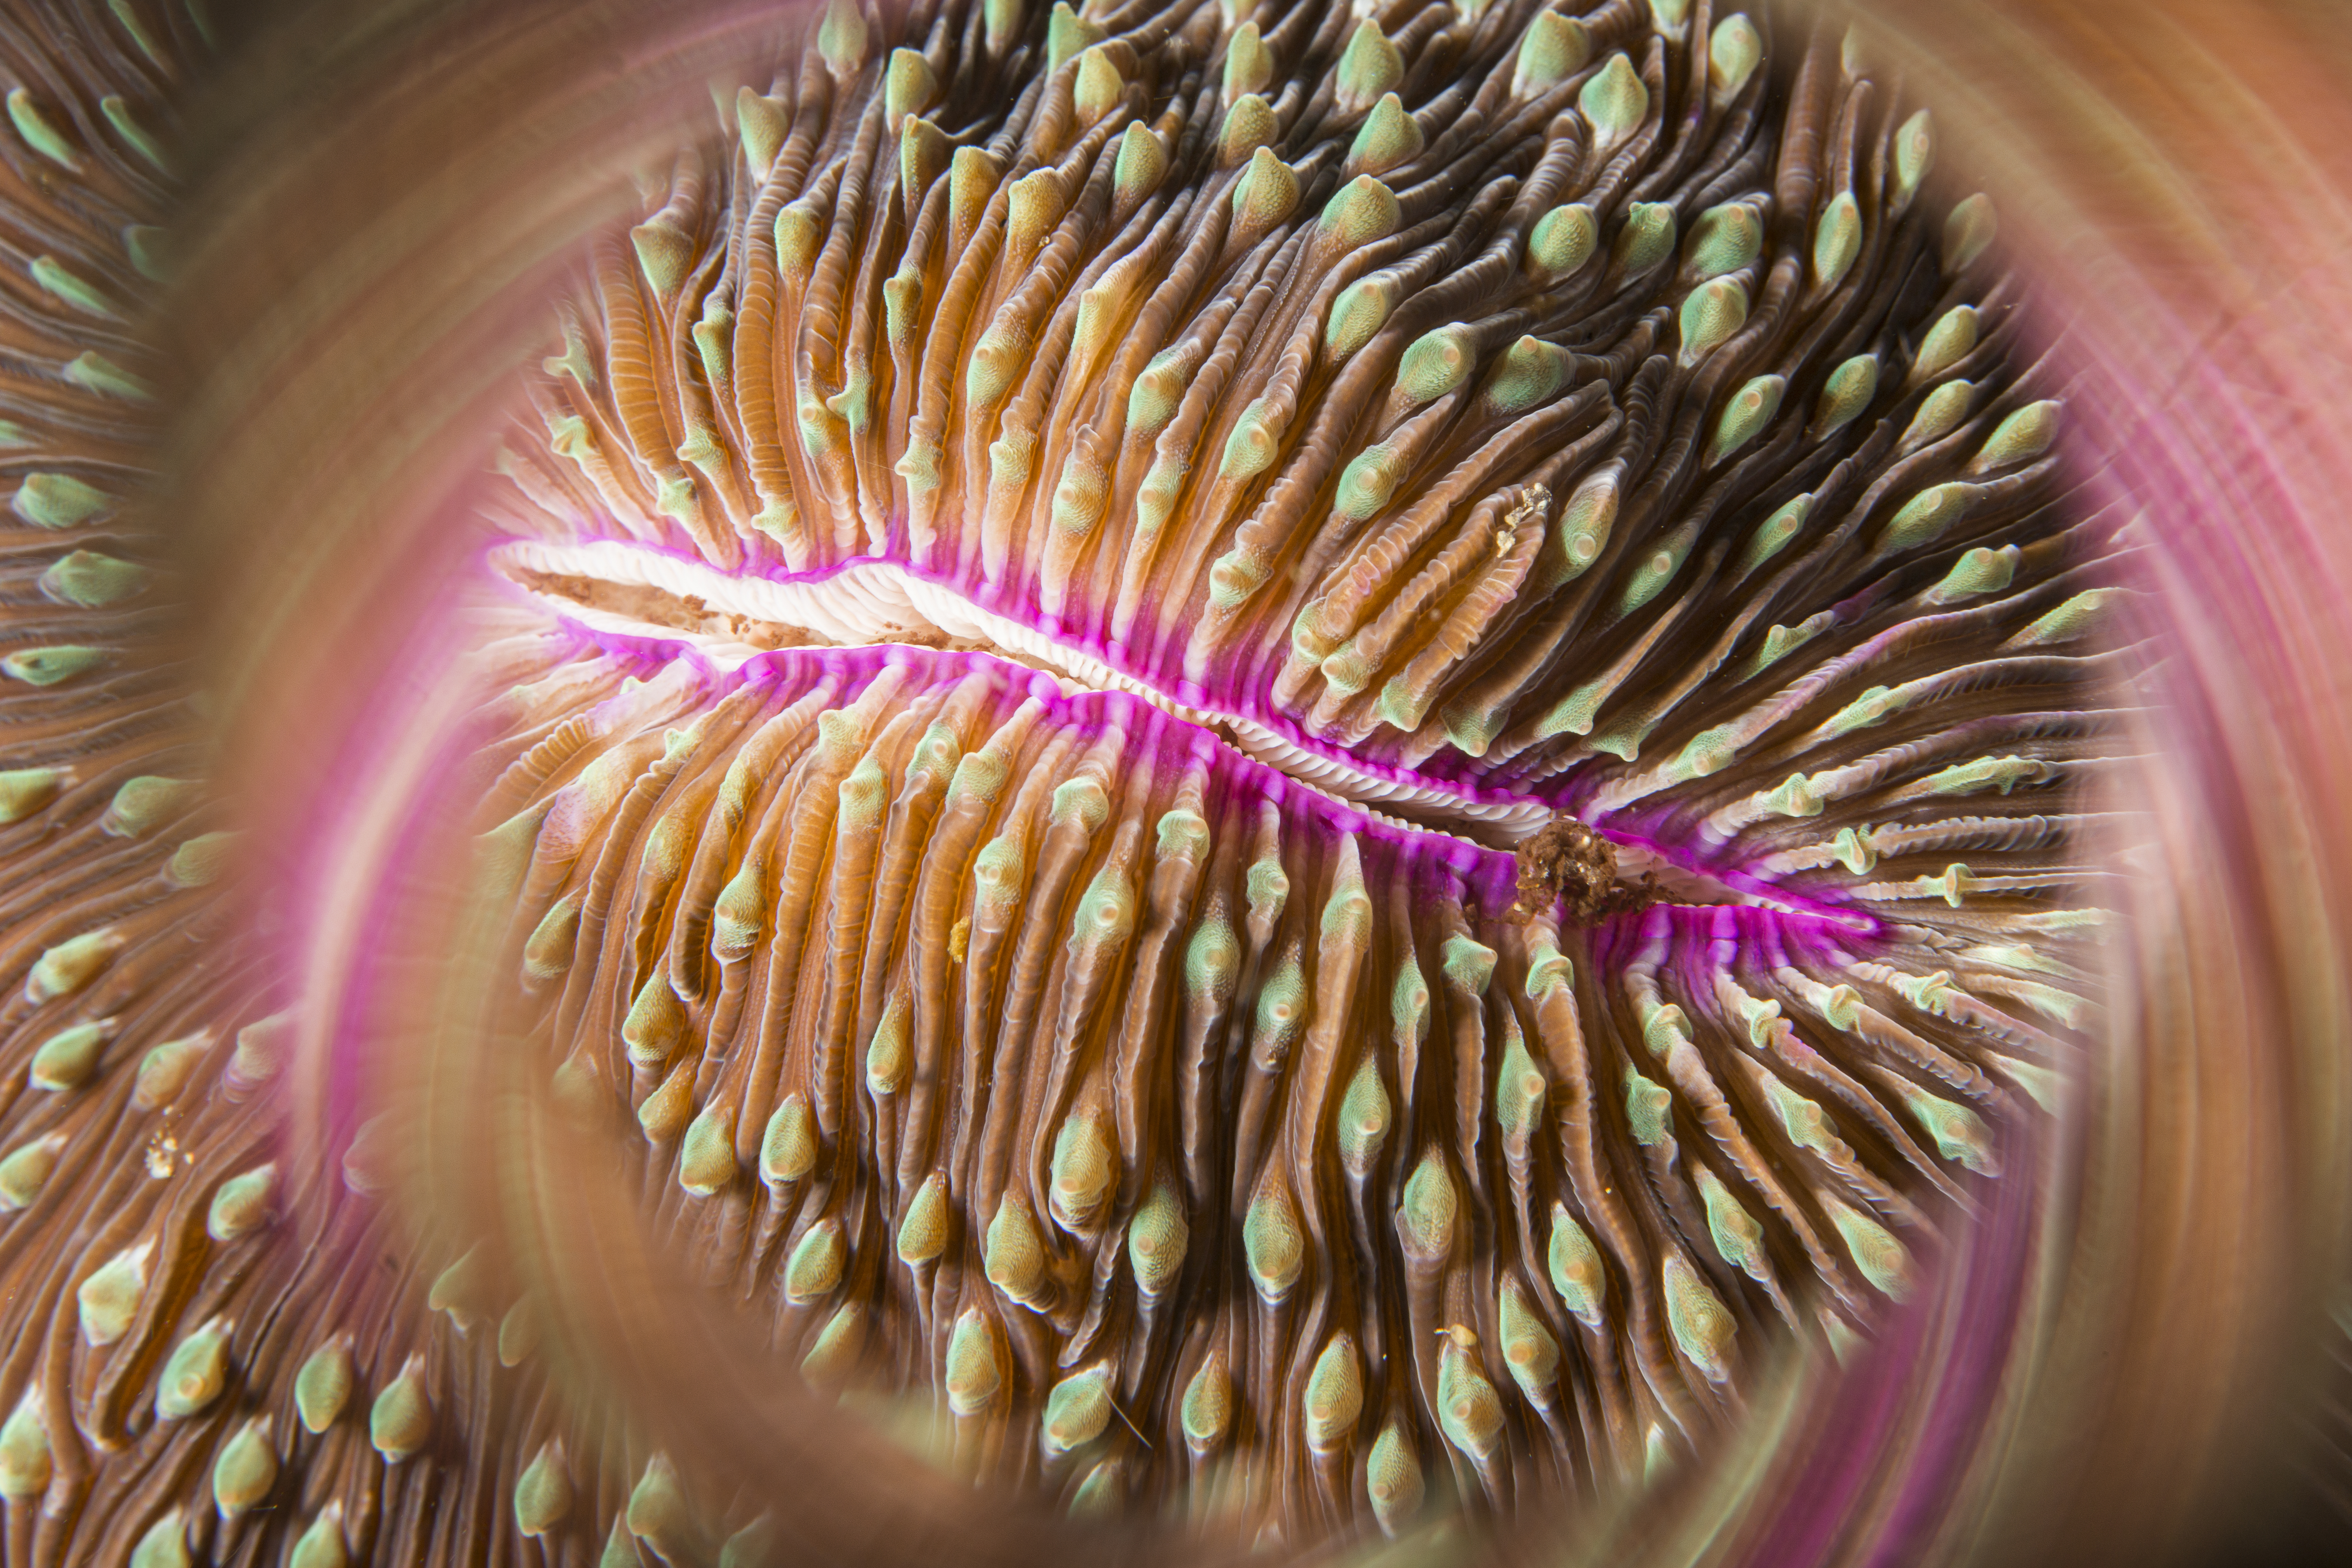
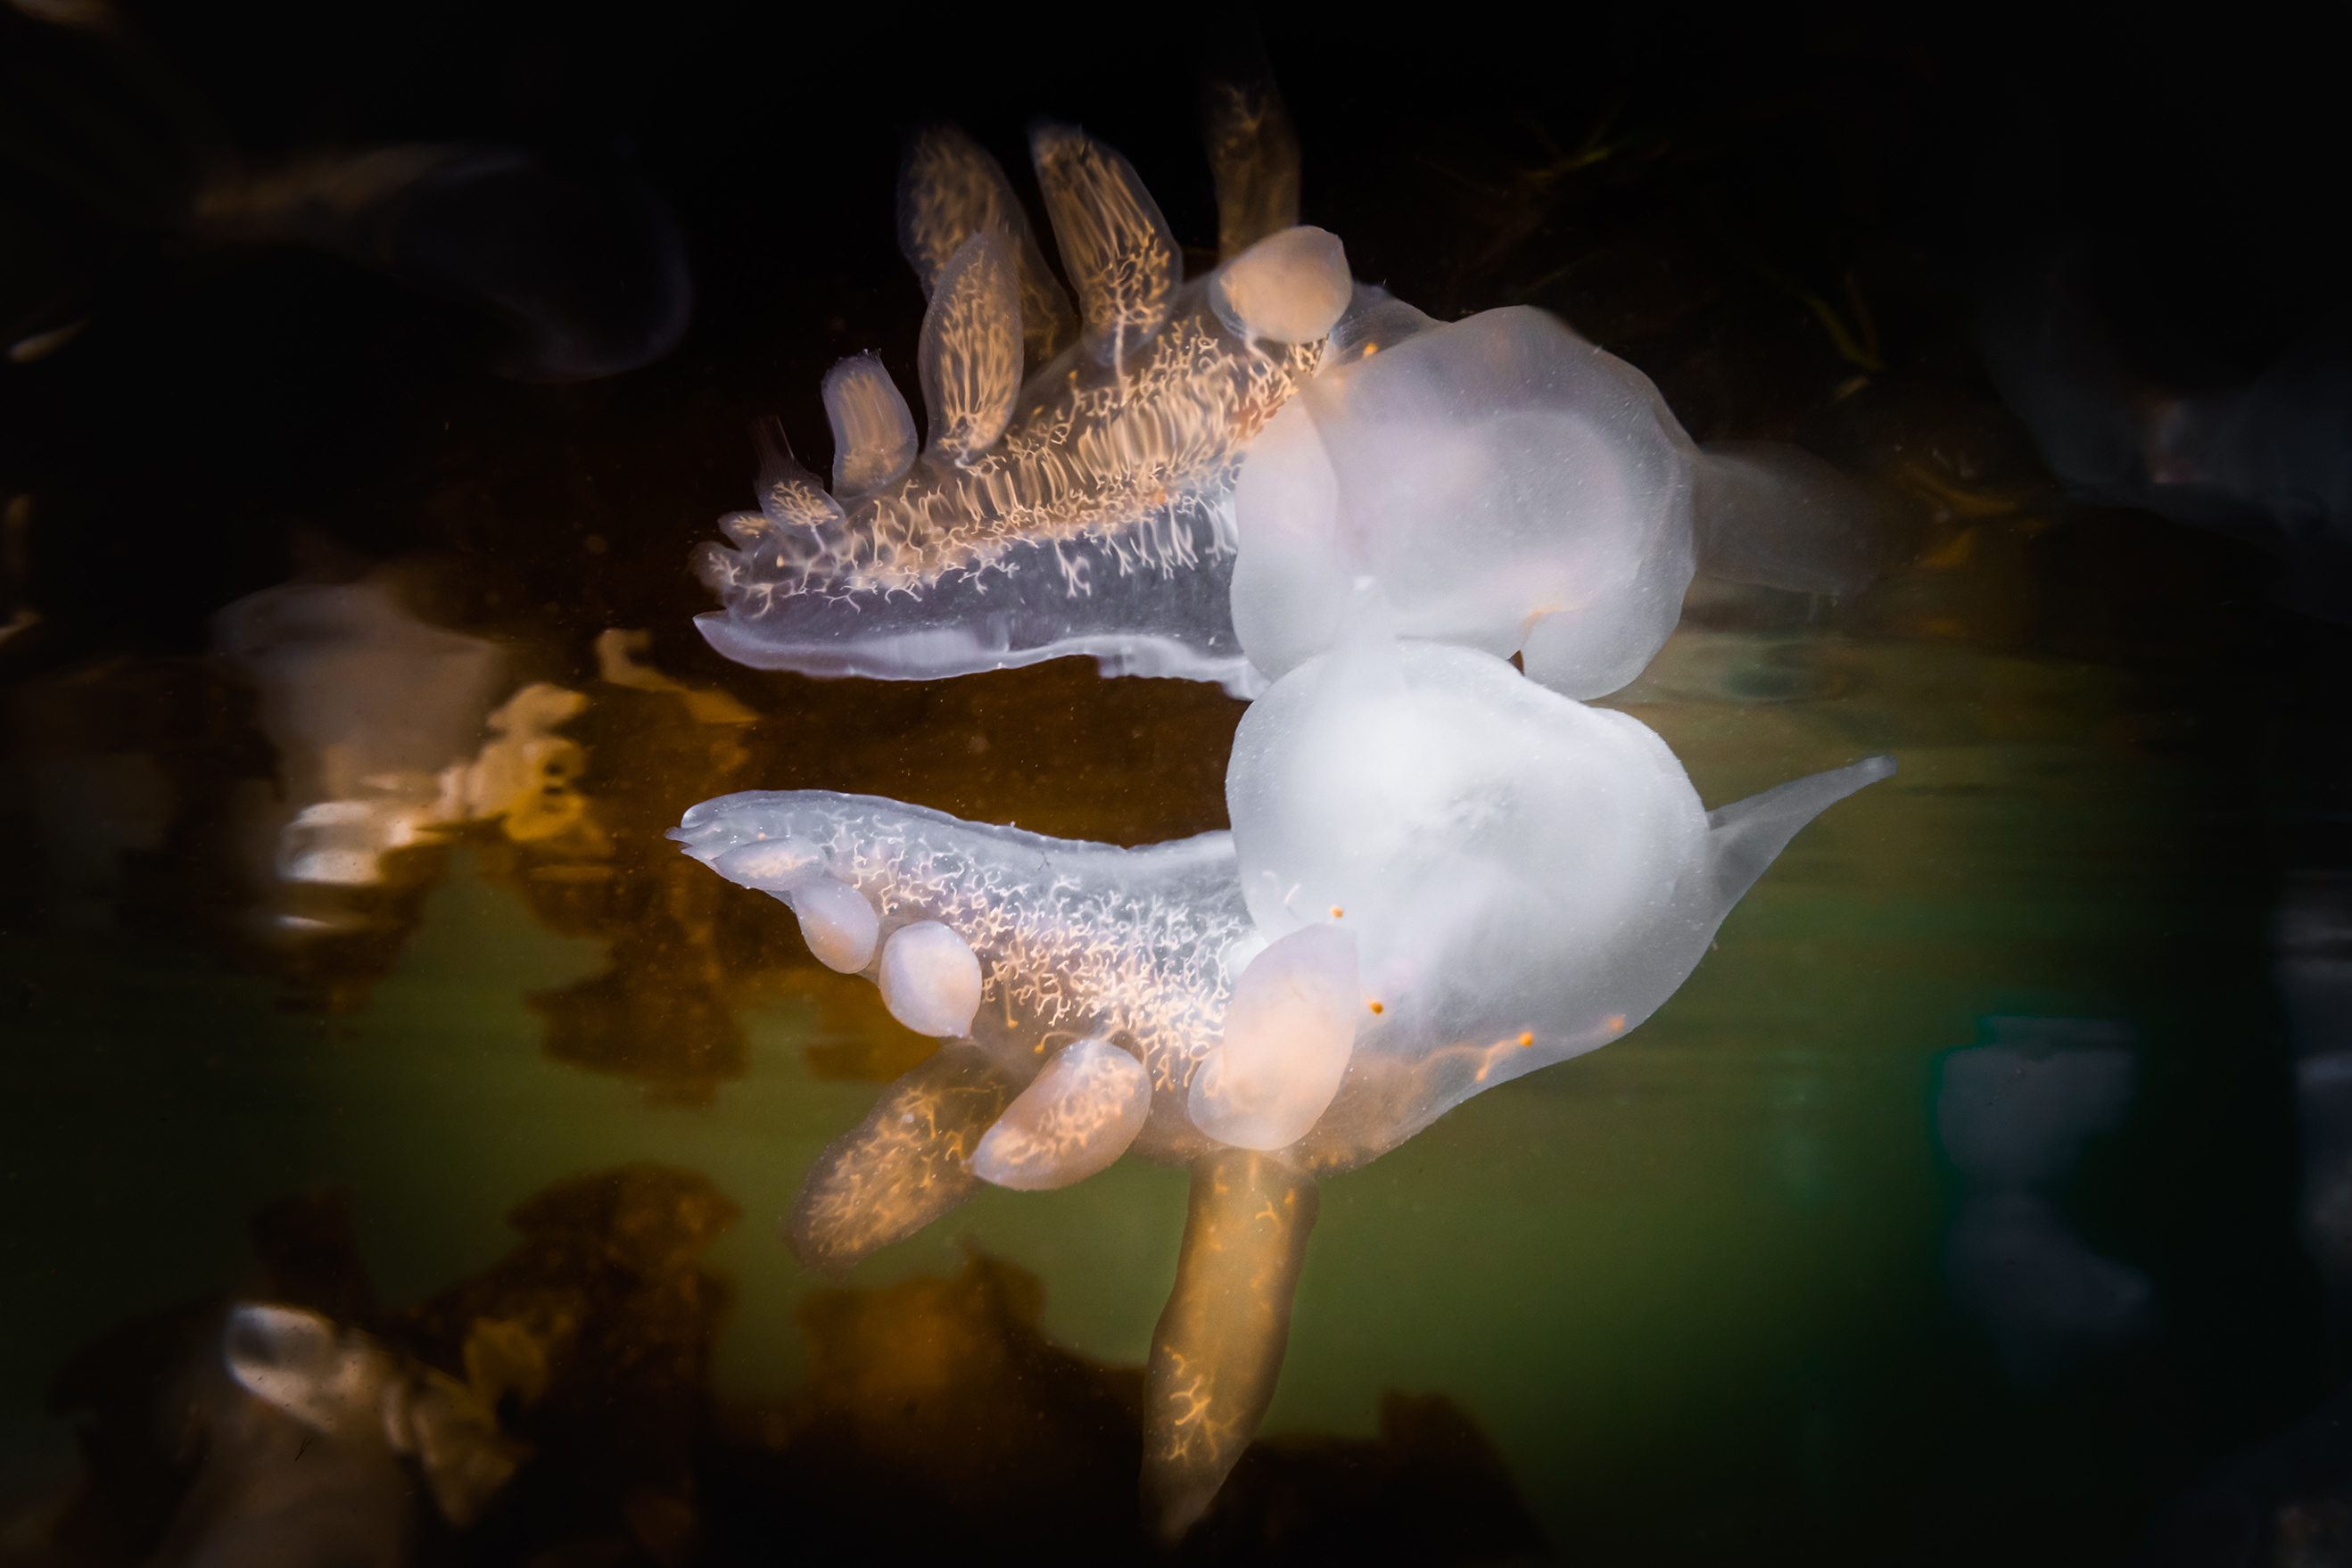
Abstract Macro
Text and photos by Brandi Mueller
One of my favorite underwater photo techniques is what I like to call “Abstract Macro.” I like to get super close to fish or coral, or whatever I can find, and take close-up shots of only small parts of the subjects’ bodies.
Marine life has incredible colors, patterns and textures, which I think often go underappreciated as we swim by. Taking an image of a whole fish might not show the unique colors and detail of the fish’s scales or the dots around the eyes or the delicate lines of the fins. Even the actual eyes of ocean creatures fascinate me as some, like shrimp, have compound eyes in which you can see the individual cones or iridescent lines.
I tend to default to taking abstract macro shots when I cannot find much else to photograph. If I am ever underwater and find myself thinking, “I have nothing to shoot,” I try to remember to get super close and photograph the amazing intricacies of the underwater world. Visit: brandiunderwater.com
Wide-Angle Macro
Text and photos by Don Silcock
“What is your favorite underwater photo technique?” An interesting question, and after 11 months of enforced hunkering down in Sydney, I have a completely different answer now, as opposed to more normal times!
Pre-pandemic, my response would have been “wide-angle close focus,” as I simply love the whole feel of such images, as they seem to place you right in the middle of the beautiful locations you can photograph with that technique. But, you need beautiful locations and good visibility to deploy that technique effectively—and, as interesting as it is, local diving here in Sydney is rather lacking in the visibility stakes.
So, I have concentrated on developing my skills around the very viable alternative of “wide-angle macro”—a technique long popular with land photographers and popularized underwater by Alex Mustard over 10 years ago.
The thing with macro underwater photography is that it is incredibly popular and really quite difficult to get different images. What I really like about wide-angle macro are the diverse and almost unique perspective it enables.
Equipment-wise, you will need a close-focusing wide-angle lens—in the Nikon world, that would be either the 10.5mm fisheye lens or the Nikon 8-15mm lens, or one could go with the Tokina 10-17mm fisheye zoom lens—plus you will need a teleconverter such as the Kenko 1.4, a small dome such as the Zen 100mm, the necessary EXR sensors and small strobes such as the Inon S2000. Then, you need to hone your stalking skills and get shooting! Visit: indopacificimages.com
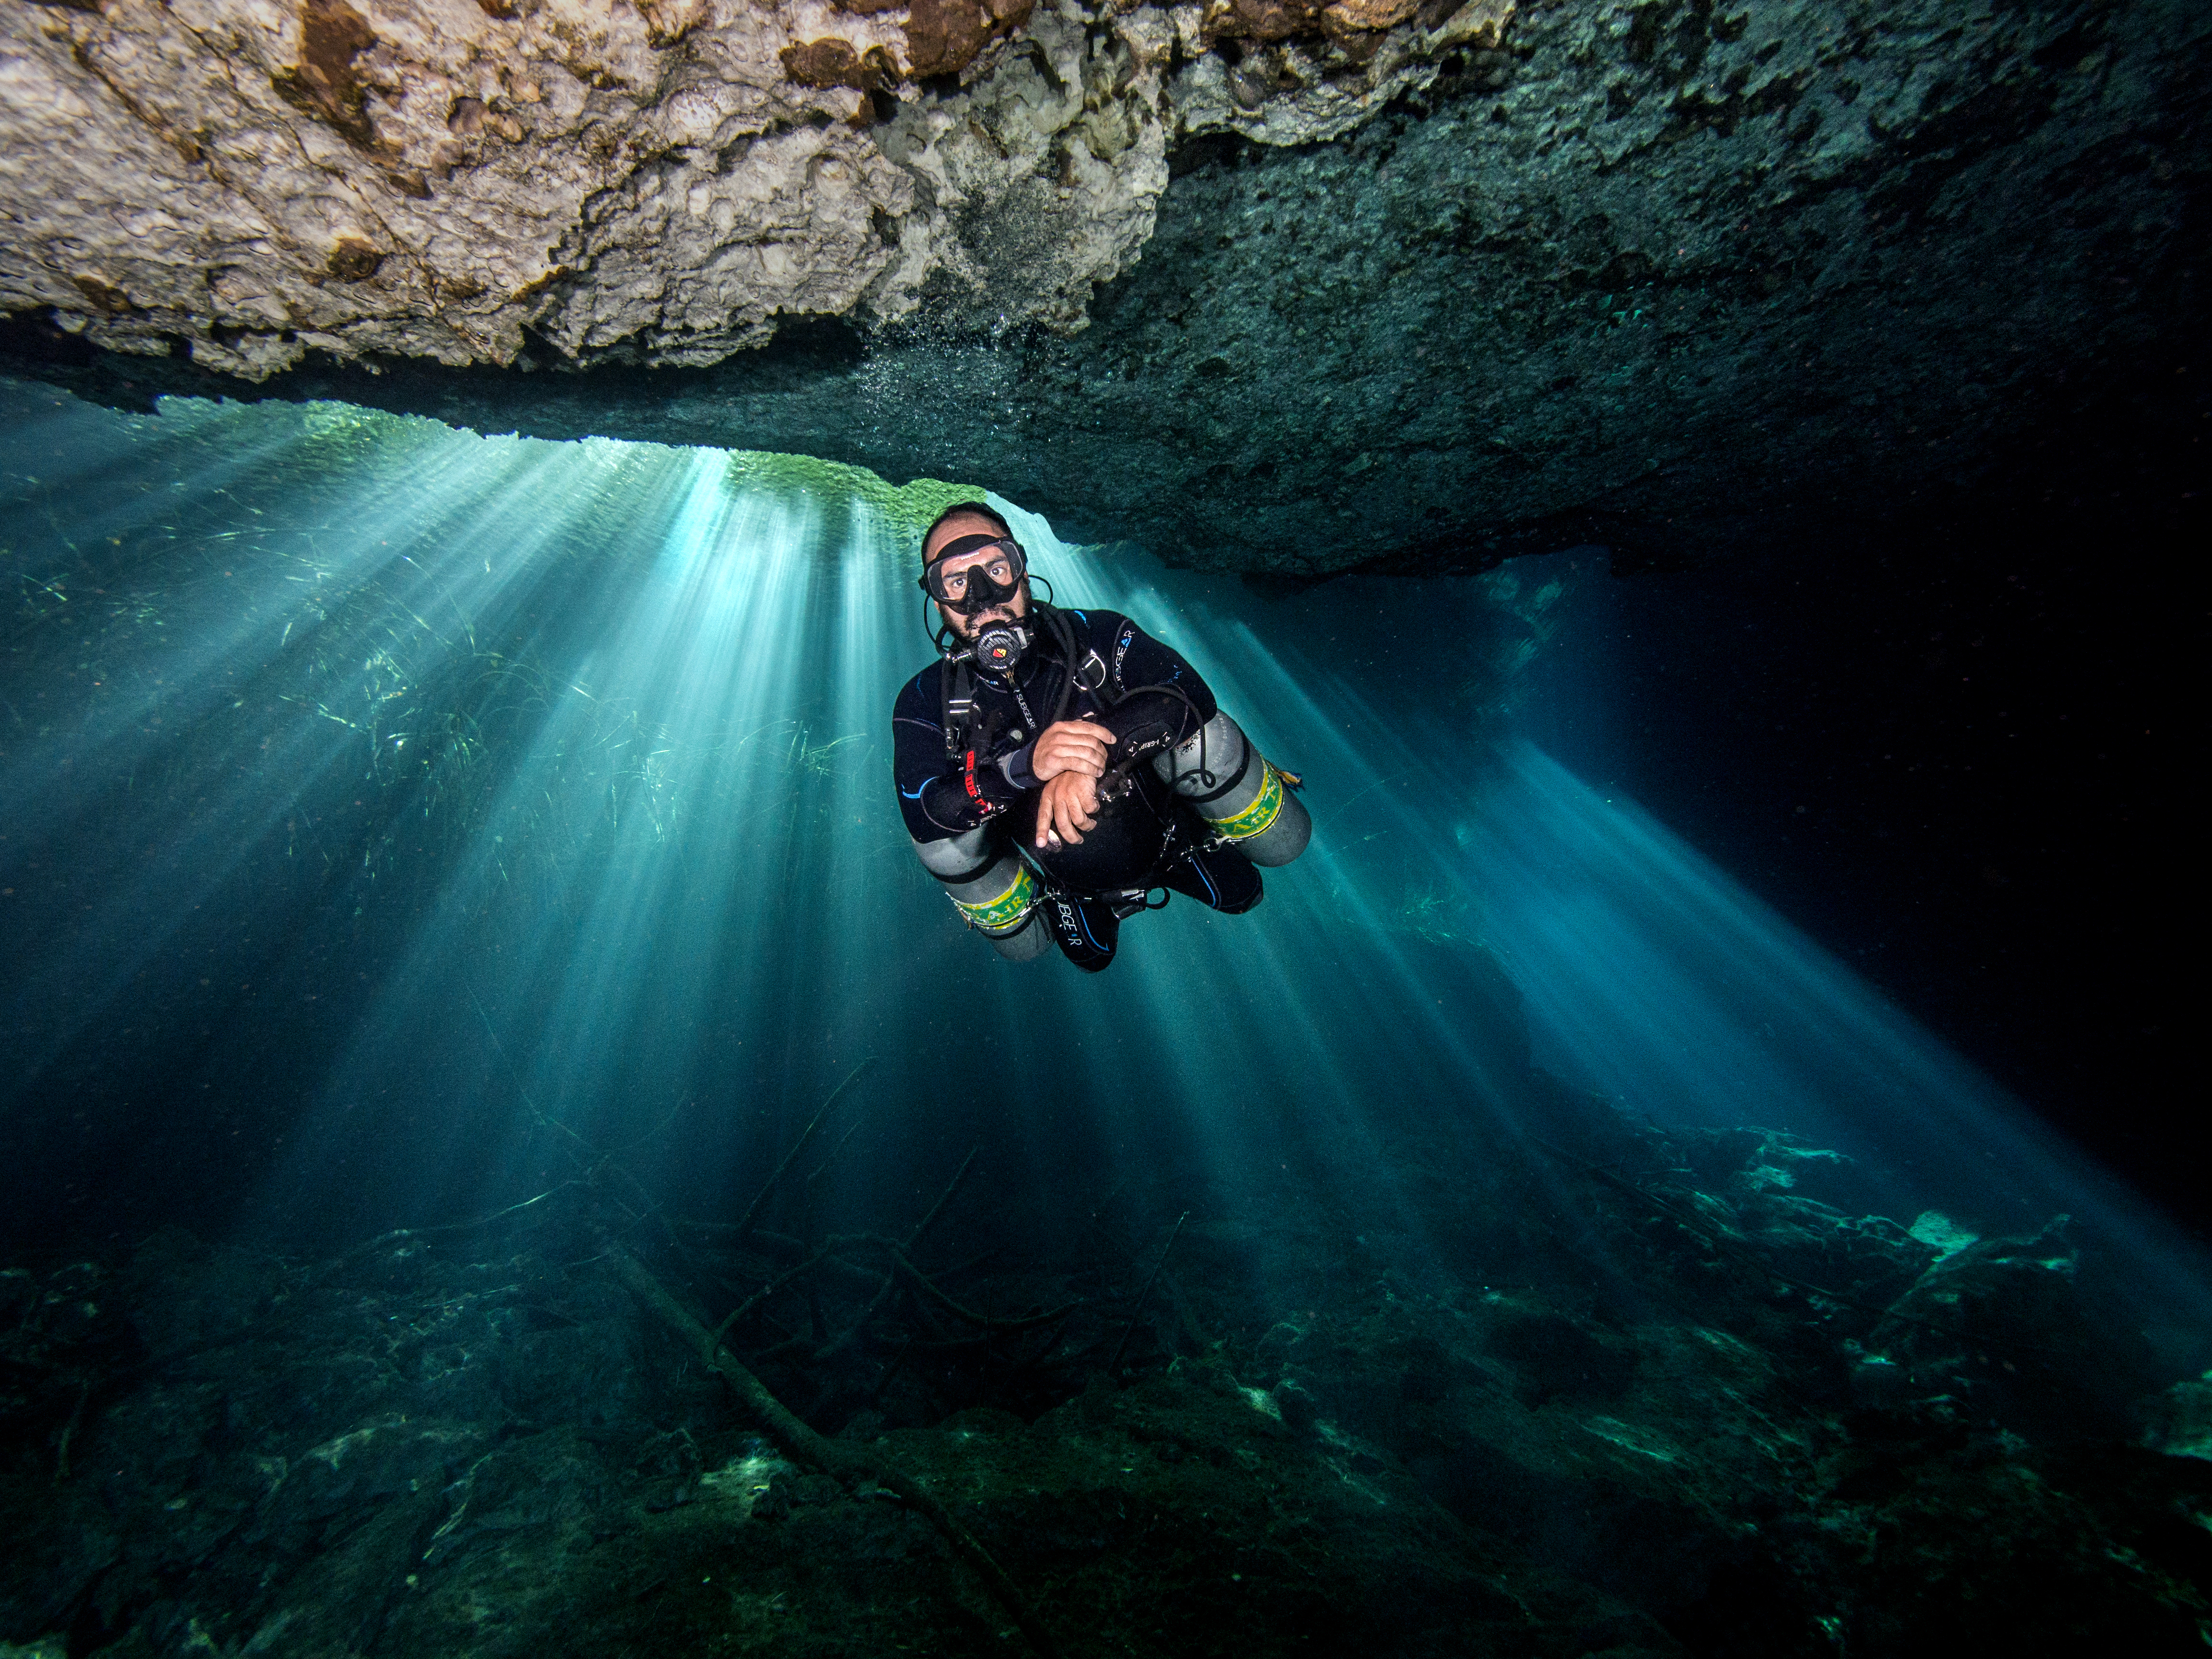
Sunrays and Sunbursts
Text and photos by Olga Torrey
When I create photographs underwater, I enjoy using light as a compositional element in the image. By using sunrays and sunburst, I attempt to create dramatic images that are pleasing to the viewer’s eye.
When I visited Cenote el Eden, also known as Ponderosa, in Mexico, I brought my camera to show the unique beauty of this dive site. I found my first experience taking photographs in a cenote a little bit intimidating. I planned to use the sun’s rays as the main element in my images. I used a Panasonic Lumix G Vario 7-14mm lens and set the camera to a slow shutter speed of 1/40th of a second. I needed to set the aperture to f/6.3 and the ISO to 1250 to capture the light streaming into the cavern. I used dual Sea&Sea YS-D1 strobes on low power to fill in the shadows, light the diver and bring out the beautiful limestone’s colors.
Another location, Dutch Springs in Pennsylvania, USA, is a 50-acre lake, which I use as an underwater studio. The lake is spring-fed from an underground aquifer, which filters through limestone. The lake offers an ample variety of submerged attractions to practice photography. On a sunny day, I will work close to the surface to capture the sunbeams to enhance the subject. In this image, I used one of the training platforms to filter the light and a diver under the platform as a human element. To light details on the diver, I used dual Sea&Sea strobes. To get a forced perspective, I used the Panasonic fisheye 8mm lens. I set my camera’s shutter speed to 1/250s, stopped down to f/7.1, and set the ISO at 250.
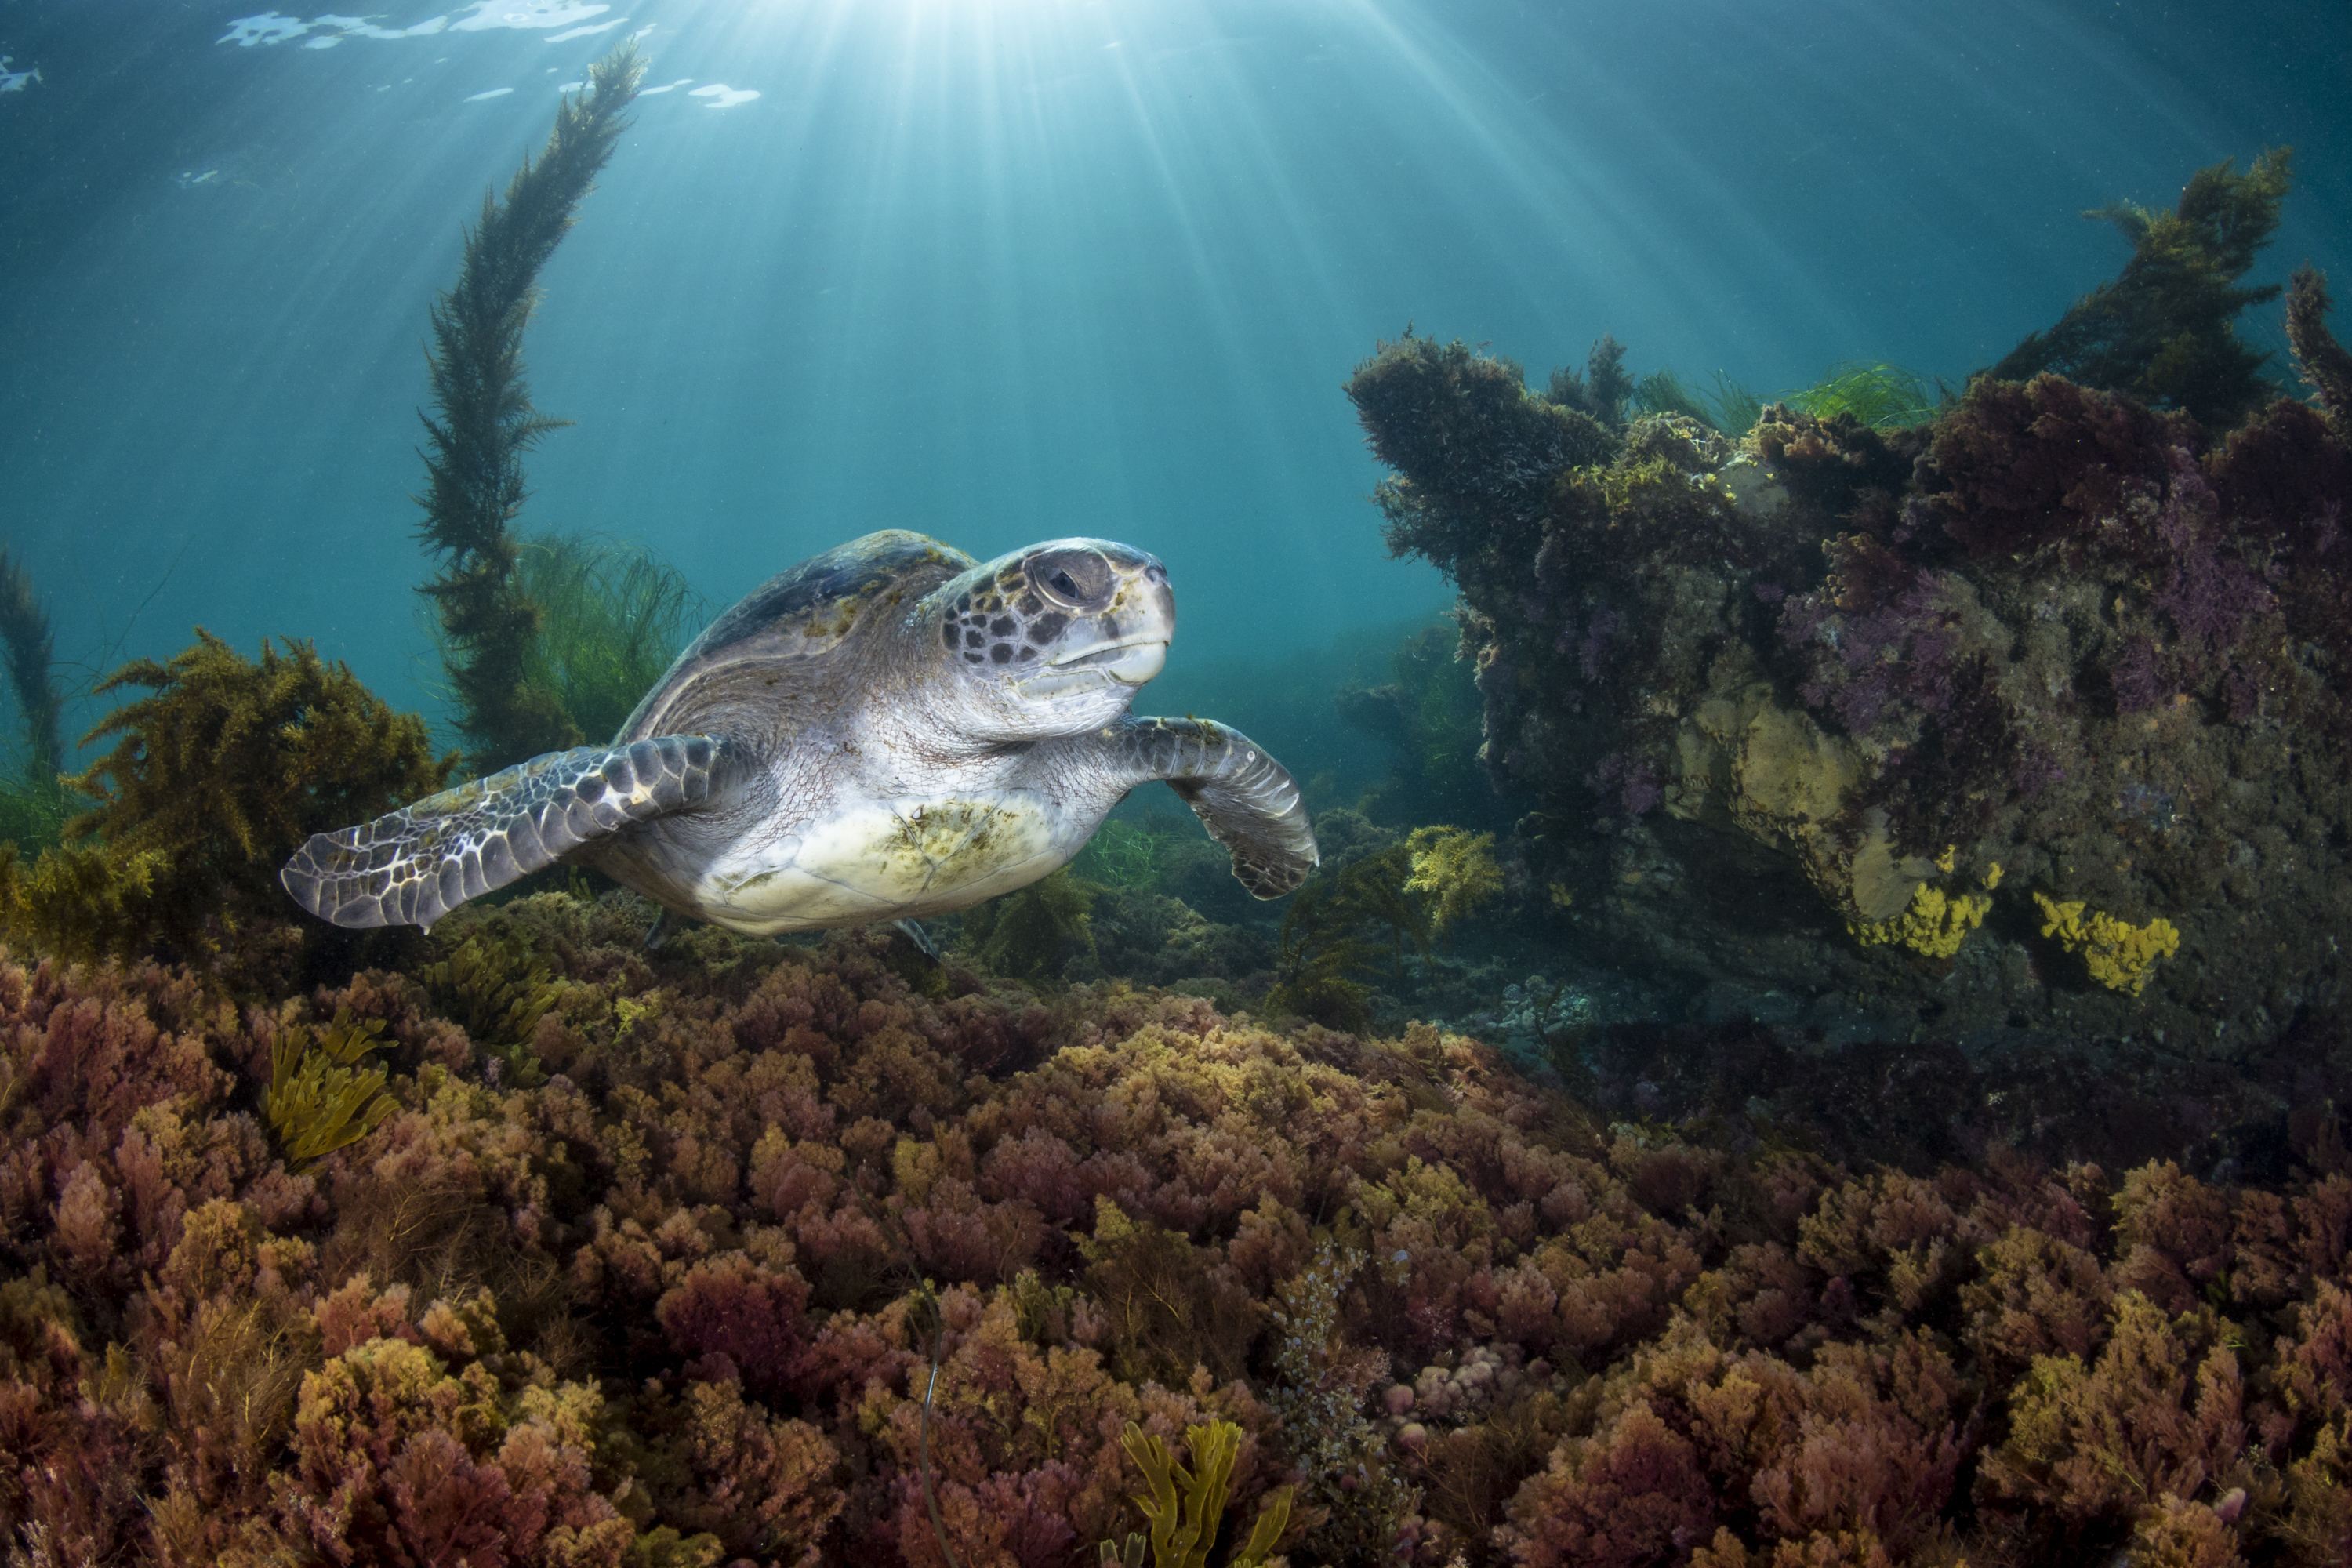
I have also been to Papua New Guinea, which is an underwater paradise for divers and photographers. On one of my dives there, I noticed a hawksbill sea turtle swimming towards me. It was a sunny day, and I waited for the opportunity to take the photo of the turtle with a sunburst. When that moment arrived, I took the shot. I filled the frame by getting very close to the turtle with my Panasonic fisheye 8mm lens. I set the shutter speed to 1/200th of a second and closed the aperture to f/16 in order to capture the detail in the background. I set the ISO to 250.
The image of the liveaboard Febrina in Kimberly Bay was taken with the idea of showing the sunburst rays coming through the ladder while divers stopped for their safety stop. I positioned myself under the boat to prevent the sun from overexposing the sunburst. I set the shutter to 1/250th, stopped down to f/16, and set the ISO at 250. I used the Panasonic fisheye 8mm lens. Visit: fitimage.nyc

Black Background
Text and photos by Martin Voeller
I would say there is a handful of favorite shooting techniques for me, but one of my favorite underwater techniques is creating a black background (even during mid-day), as it often gives a strong contrast from the subject and pops the subject out, potentially giving a “wow” effect for the viewer. And there are several ways to achieve this effect, which includes positioning your strobes in a certain way, but my recommendation in achieving black backgrounds is by directing your strobes forward to directly light the subject and controlling the background via your shutter speed and aperture. This applies to both macro as well as wide-angle.
Before making adjustments to your camera settings, you must first ensure that there is no object directly behind your subject; else, this method will not work, as the forward-directed strobes will end up lighting the object as well. In other words, there needs to be an open water column behind the subject.
Once this environment is achieved, it is time to dial in your camera settings. First, when photographing underwater with strobes, shutter speed itself does not affect the brightness of the lit subject—it only controls the color of the background. Therefore, make the shutter speed as fast as possible: 1/250th of a second in most cases.
Next, as you want to cut out any further ambient light, you should minimize the aperture as small as you can. However, as you stop down your aperture, you will need to increase the strobe power, possibly towards full power, to ensure your subject is well lit (but this will not affect the background, as that is controlled by your shutter speed).
One last word of advice: Backscatter is the bane of black background photography. It will become more evident against a black color, so you must direct your strobes a bit outward to minimize or avoid this phenomenon. Visit: poseidonphotos.com


")


 the flat-bottom and the Ses Fontanelles I.")